Table of Contents
Updated
You should check these fix methods when you get the Abilitare Avvio USB BIOS error. g.Use your PC, pre-F12 (Fn + F12) via USB port USB.
g.A “
Start page instructions » How to enable booting from USB drives in BIOS
You will find this article helpful if, for example, you are looking for a way to provideBoot your computer from a USB stick instead of booting from your hard drive. In this article, you can learn how to enable USB boot in BIOS settings so that you can fully boot your computer from a Windows recovery disc.
Enable Boot Slider In BIOS
Come fare il boot da USB su UEFI?
Options Menu / Boot Replacement I support HP and Dell, depending on whether you have the option to use the first USB support or the preliminary DVD with the F12 or F9 keys. Potrai accesses menus through options that are used to access raw data, as well as through BIOS or UEFI system access.

Typically, most computers boot outside of the hard drives on which the computer’s operating system is installed. While some laptops or new computers allow the USB stick to boot during the boot process, others categorically cannot.
Follow these steps to ensure that your computer can transfer the USB drive and make it accessible by booting the USB drive if it is not configured to do so.
1. Connect the bootable USB stick to your computer’s USB plug-in.
Updated
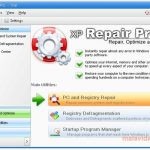
Are you tired of your computer running slow? Annoyed by frustrating error messages? ASR Pro is the solution for you! Our recommended tool will quickly diagnose and repair Windows issues while dramatically increasing system performance. So don't wait any longer, download ASR Pro today!

Note. You can skip steps 1 through 4 and go directly to step 5 if you are sure your computer is not configured to boot from a USB drive.
2. Remove other useful portable media such as CDs, DVDs when the computer is onluchen, and turn it on.
3. If the computer is configured to automatically start from a USB drive, you will see a screen with the message “Autostart takes 10 seconds …”
4. If you think your computer is trying very hard to boot the disk, you need to manually configure it to boot from a USB drive.
5. Wait for a safe moment when you can restart your computer.
6. Restart your computer and look at the screen for instructions on which key you need to press to enter this boot device selection menu or BIOS Setup.
Messages on the touch screen are similar to pressing the [XXX key] to enter Setup or BIOS SETUP. You only have a few minutes to read the instructions on the projector screen. Restart your computer if someone missed the opportunity to read the workout correctly.
Please note that you may need to press the suggested key more often than the one below to enter the BIOS. You don’t have to store the key (just press and release accordingly). Also, do not press the button, as you may block the system correctly or
more than once.Generation of system errors.
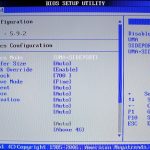
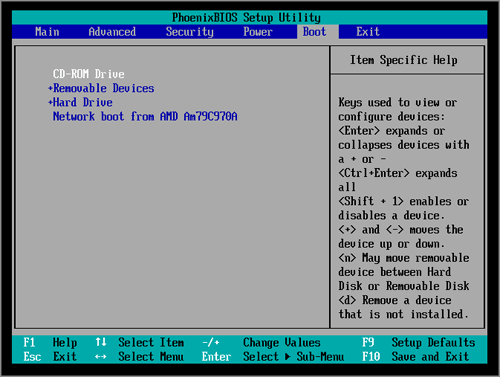
8. Go to the boot tab of the BIOS utility and use the keys to boot the computer from the USB drive first in the boot order.
Note. In the caudillo, most computers set the USB boot to removable media or USB boot option in the BIOS. However, on computers, some USB boot options may be listed under the Hard Drive section. Be sure to check the actual hard drive section if you’re having trouble finding the USB boot option.
10. Your computer is now ready to boot from a USB stick
When you enable booting from a USB device, the main thing you are trying to do is start your amazing computer with the operating system installed on the USB device, the operating system that is installed on the entire hard drive, so say
You can easily create a Windows bootable USB drive or Windows recovery USB drive to use Windows operating systems. They let zagBoot your computer from a USB drive when your Windows computer is having problems, and troubleshoot.
- How to change the default search engine in Windows 10
Why Should You Enable Booting From USB?
Usually you see if you need to enable booting from a musical instrument from USB media if you have an installation media (Windows ISO file) and want to know something like installing a new Windows operating system on your computer What is the method to enable USB download on your amazing Windows computer.
This is different on every computer, but usually requires restarting the computer and then pressing a key (or key combination) even if the computer boots. Usually for a component you need to press Esc (5-10 times), F2, F12 – it depends on the manufacturer. The best way to save money is to do a Google search for “[device brand] how to enter BIOS”.
- Make sure your USB stick is bootable. When someone does not know how to pay, how to create a bootable USB drive.
Connect printer to USB port, reboot computer and enter BIOS settings.
-
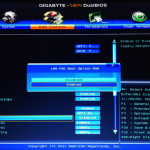
To bring up the Boot tab in BIOS settings
-
Select â € Boot – Option # 1 –
-
Press ENTER.
-
Come attivare UEFI boot?
Receiving fraud from a PC Access to all Avvio parameters, through Accedere all UEFI firmware impostations without using Cliccare with a full version of problem solving, advanced options and an endless choice of UEFI firmware removal impostations. Install a computer that supports this UEFI installation.
Select your USB device

Press F10 to save and exit
If you don’t see your USB stick, be sure to do the following when trying to select it as your boot option:
-
Deactivate any “Start CSM” option using the arrows to access the option and ENTER to change it permanently
-
Click the Security tab.
-
Disable Manage Secure Boot.
-
Save all settings
-
The personal USB key should now be in the Tab Start
If you have an older laptop, you may not be familiar with the Run CSM or Secure Boot options
-
Click the Boot tab
-
Select Hard Drive in BBS Priorities – Option < / p>
-
The available launch options are required to be listed here
-
Come modificare il boot nel BIOS?
BIOS access menu.Made from the avvio menu, Cerca l’ordine di avvio da modificare.By changing the device used as the primary, follow the source BIOS configuration code each time you change the current value.
Click for Launch Option # 1 < / p>
-
Make sure your USB drive is listed
-
Select it and press F10 to save and exit
Some More Tips
If you are going to install a creative Windows operating system on your device with the best USB device, make sure you use the most appropriate tool to transfer the Windows ISO file to a USB drive for copying.
I have personally used a tool called Und “rufus”. I liked it because it had additional optimization settings.
For example, it is important to select the correct target system (BIOS or UEFI) when copying installation media that is returned to a USB device.
If you need information on how to install a Windows operating system from a USB stick, write to us below and you’ll get a detailed guide pretty quickly and congratulations on getting closer to technology!
Come onPlease discuss some very important reasons why you should not put your computer to sleep.
Speed up your computer today with this simple download.Consejos De Reparación Abilitare Avvio Usb Bios
수리 팁 Abilitare Avvio Usb Bios
Suggerimenti Per La Riparazione Abilitare L’avvio Del BIOS USB
Conseils De Réparation Abilitare Avvio Usb Bios
Porady Dotyczące Naprawy Abilitare Avvio Usb Bios
Reparatietips Abilitare Avvio Usb Bios
Reparaturtipps Abilitare Avvio Usb Bios
Dicas De Reparo Abilitare Avvio Usb Bios
Reparationstips Abilitare Avvio Usb Bios
Советы по ремонту Abilitare Avvio Usb Bios