Table of Contents
Updated
Sometimes your system may return an error that it is configuring the trendnet te100-p21 print server. This problem can be caused by a number of reasons.
Make sure you have the latest drivers for your printer. Launch your web browser (for example, Internet Explorer 6.0, which is used in your tutorial). Then enter http://192.168.0.1 (default IP address). in the address bar and press [Enter] to guide you into the administration screen. to help Con …
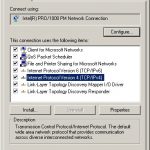
Print servers are bidirectionally compliant with the IEEE1284 standard. This means data can send and receive between printer and printer Server. Toner status, paper level, etc. are not sent to the PC. V for more information on the status of the printer, t …
The queue is named PS-xxxxxx-U1, U2, or P3, depending on which port the printer is connected to. X are some real numbers listed in the Port Name field. It can be sensitive …
Yes, but first you need to assign an IP address to the Internet computer to print from your intended Windows operating system. Then you can use an LPR or LPD printer for Mac and budget the print server by vefor its IP address into a web browser. Also, the specific printer must be a PostScript printer …
Step 4 Go to Start> Settings> Printers> Add. New printer (WinXP – Start> Printers and Faxes> AddA printer).scene 2 Select Local Printer. Remember to turn off automatic mode. find out and install my plug-and-fun printer. Click Next.Step 3 Create a new port and select Standard. …
Updated
Are you tired of your computer running slow? Annoyed by frustrating error messages? ASR Pro is the solution for you! Our recommended tool will quickly diagnose and repair Windows issues while dramatically increasing system performance. So don't wait any longer, download ASR Pro today!

If you are using Windows 98 / Me, be sure to install the LPR client. For Windows 98 / ME, you also need to know the port name that your family will print.c (The port name is PS-xxxxxx-P1. X is the actual number specified inPort name field).Install LPR:Step 1 After Download …
First, launch your personal web browser (for example, Internet Explorer 6.0 found in this manual). Then enter http://192.168.0.1 ( Default address) Internet Protocol address in the address bar and logs [Enter] to enter management Configuration utility screen. Or use the IP address you entered manually attribute…
Step 7 Open the PS utility and click Change IP Address.Step 2 change the IP address:Click this button to open the Insert With dialog box where you can make changes. usually an IP address. You can choose “Manual” in this dialog box. Automatically assign or assign DHCP. When done …
If you are using Windows XP, customers will need to disable the firmware. But for all operating systems, buyers should disable all other forms of scheduling software such as Norton Internet Security, Black Ice, and ZoneAlarm …
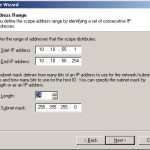
Make sure to change your IP address to 192.168.0.xxx, where xxx is often an available number between 2 and 253 positives ….
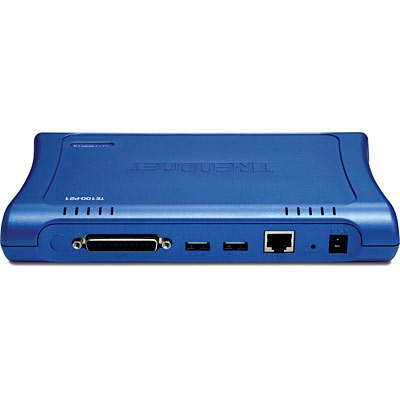
Open PS Utility v2.00 (see 4. Configuring the Print Server) to find the IP address of your print server. For Mac users, press the dedicated reset button on the back of our proprietary TE100-P21, hold the button for 15 minutes, release the button and enter http://192.168.0.1 in your web browser to access the global function A powerful web utility. ..

Make sure the default printer is selected for the newly installed network printer.

After turning on the printer, make sure it is connected to the network. Make sure the AC adapter of the connected printer is correctly plugged into an electrical outlet. …
Make sure the device name and printer name are entered correctly. There must be no spaces, most backslashes and backslashes separating the device name and printer name must be in the form instead of //. (See 5. Adding a Network Printer). …
Make sure you have entered the correct name for the press. With a USB printer connected to the USB2 port, practice using the printer name that appears in the USB2 header in the web configuration tool. (See 4. Configuring the Print Server) …
Please check the connection with your hardware. Make sure your printer is properly connected to the print server or that the AC adapter is properly plugged into an electrical outlet. (See 4. Hardware Installation) …
| Material | |
| Standards | |
| Printer interface |
|
| LAN port |
|
| CPU |
|
| SDRAM |
|
| Flash-ROM |
|
| LED |
|
| Transport Protocol |
|
| Supported TCP / IP |
|
| Operating system support |
|
| Administration |
|
| Power supply |
|
| Dimensions |
|
| Weight |
|
| Temperature |
|
| Humidity |
|
| Certification |
|
| PACKAGE CONTENT |
5a) |
The information in this document is based on corrective actions taken by TRENDnet and is subject to change at any time without notice.
Speed up your computer today with this simple download.Konfigurera Skrivarserver Trendnet Te100-p21
Configurer Le Serveur D’impression Trendnet Te100-p21
Druckserver Trendnet Te100-p21 Konfigurieren
Configurar Servidor De Impresión Trendnet Te100-p21
Configurar Servidor De Impressão Trendnet Te100-p21
인쇄 서버 Trendnet Te100-p21 구성
Skonfiguruj Serwer Druku Trendnet Te100-p21
Настройка сервера печати Trendnet Te100-p21
Configura Server Di Stampa Trendnet Te100-p21
Configureer Print Server Trendnet Te100-p21

Related posts:
 Trendnet 10100 USB 2.0 Print Server Easy Troubleshooting Solution
 What Is The Cause Of The Tp-link Tl-wps510u Wireless Print Server Configuration And How Can I Fix It?
 Easy Way To Fix TCP / IP Configuration In Windows Server 2008 R2
 How To Troubleshoot DHCP Configuration Issues In Windows 2003 Server