Table of Contents
Recently, several users told us that they came across an inspiron 531 recovery disc.
Updated
Windows Vista does not have permission to create a recovery CD, which should be available in Windows 7 and latersiyah.
However, if you give me the system service tag and the name registered to that system in a private voicemail message, I can see which is probably best for you.
I added you because of a friend. Please accept my request to the employee by clicking my name highlighted in blue, then clicking the Friends statement above, then clicking Request a Review, and finally clicking the Accept button.

I am also sending you a confidential message. Click Inbox to reply to the message and tag it with a system service tag and contact information so that I can access your system records and take further action. You can also click “Start Chat” to send me a private message.
Step 4 corresponds to individual updates, just download and install them, for example, as drivers. You have 32-bit Windows Vista, so you need:
Please note that the DVD in question may or may not contain Service Pack 1, if your DVD does not have Service Pack 1 apostille, please download it. If he’s already It is used, it is not necessary.
Make sure companies install it after you go to the Windows desktop, but before you leave. (You install it in step 9. Just run the file, then click Next and restart when prompted.)
Step 6 is not required for your system. This is sometimes necessary.
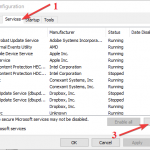
Step 7. Usually not required for your system, as this is not a Media Direct system. DBAN is partially optional, it just formats some drives better than the standard Windows type, but you can ignore it.
Follow step 8. You will get the same projection screens as shown. I have included several methods in the tutorial. However, just follow our own screens below.
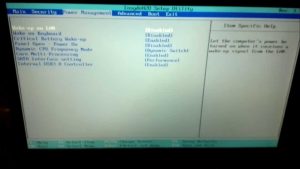
Insert the resulting DVD or created Dell Recovery DVD or High Load USB Drive. If necessary, also insert a USB drive with a SATA driver. Turn off your computer. Press and hold F12 while managing your computer (from Dell BIOS screen).
Press any key when the prompt “h” appears while pressing any key for Boot from CD / DVD.
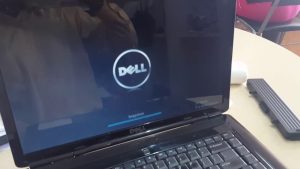
You will see a black screen that says “Windows is launching files” and then another one that says Microsoft Corporation. They should disappear pretty quickly. Then, what is often said about starting Windows
Updated
Are you tired of your computer running slow? Annoyed by frustrating error messages? ASR Pro is the solution for you! Our recommended tool will quickly diagnose and repair Windows issues while dramatically increasing system performance. So don't wait any longer, download ASR Pro today!

You will then be asked for your language, party and currency format, and keyboard settings. I have it all set to UK as suggested below, change it as you see fit.
Make sure the “Hide drivers incompatible with the computer system” option is enabled on your computer (should always be set this way by default). Select all the drivers listed and go back. This will bring you back to this screen. Select “Disk Options”.
The player options should appear. Click on the largest section and choose a format. Leave small business alone.
Then you will see a screen showing the progress of the installation.
Enter the user’s primary name. Then enter your password, enter it again and leave a hint. Otherwise, just select Next (no details – not recommended, but optional).
Now yes Let’s give the computers a common name, by default this name can be “PC-username”, but you can change it to any other. Next, you will consider your options for updating Windows. I usually select Use Recommended Settings.
Configure the network settings and, if necessary, connect to a wireless network. Please note that if the Wi-Fi and / or Ethernet drivers are not installed, your site may not receive it or may be able to do so. You can skip this step and login later.
When a person logs on for the first time, Vista can detect their hardware in the last few minutes.

Service Pack 1 is extreme. Service Pack 2 is important.

Step 15. This is not necessary if you saved everything in the climax in step 11 and chose the format in step 11.
linda339802003, try it here and in the Dell manual: “NOTE: Using a Dell PC Restore or Dell Factory Image Restore in any other way will delete all data on the car’s hard drive and any software and drivers that might be damaged. If possible, back up your data before using additional devices. Only use the PC Restore or Dell Factory Recovery Image if System Restore did not fix your system problem. NOTE. Symantec Dell PC Restore and Dell Factory Image Restore may not be available in some countries. or on some computers.
Use Dell PC Restore (Windows XP) or Factory Image Restore (Windows Vista) only as a last resort to restore your well-deserved system. These options return your hardner to the working state it was in when you bought the computer. All or alternatively program files added after you have a wonderful computer, including data files, will be permanently removed from your hard drive. Data files include spreadsheets, documents, emails, digital photos, music files, etc. If possible, back up all data before using the restore function.i PC and Dell Factory Image Restore.
While loading, you will see a blue bar from www.dell.com at the top of the screen.
If you don’t press
NOTE. If you do not want PC recovery to proceed, click Restart in the next step.
NOTE. Do not turn off your computer manually. Click Finish and tell your computer that it will completely reboot.
The computer will restart. When the computer returns to its basic operating state, the displayed screens, even those specified in the End User License Agreement, are usually the same as when the computer was turned on.
NOTE. Depending on your configuration, you may need to select Dell Factory Tools and then Dell Factory Image Restore.
NOTE. If you do not want to proceed with the factory image restore, click Cancel.
Select the General checkbox to confirm that you want to continue reformatting the hard drive and restoring the system software to its factory state, and then click Next. Recover
The process will start and may take five minutes or more.
When restoring the system and factory-installed applications, a message is displayed to ensure that the system has been restored to the factory state.
NOTE. When you uninstall Dell PC Recovery from your hard drive, the PC Repair Utility is permanently removed from your computer. After most people have uninstalled Dell PC Restore, you probably won’t be able to use it to restore your computer’s operating system.
Dell PC Restore programAllows you to restore your computer to the operating state it was in when you bought the computer. It is recommended that you do not remove Restore pc from your computer, even in order to find additional space on your hard drive. If you uninstall PC Restore from your hard drive, you will never be able to access it again, and you will never be able to use PC Restore, which will return your computer’s operating system to its original state.
NOTE. If you are not logged in as a local administrator at all, the principle appears that you must log in as an administrator. Click Logout, and then log in as a local administrator. NOTE. If the PC recovery partition does not exist only on your computer’s hard drive, a message will appear stating that the partition cannot be found. Click “Finish”; There is no section to delete.
The recovery partition will be deleted and the new free space will be included in the allocated free spacee space on our hard drive.
Speed up your computer today with this simple download.
How do I get a Dell recovery disk?
Turn the computer forward. If the Dell logo is available, press F12 on your keyboard for days and nights to access the Computer Setup screen. Use the arrow keys to select the USB drive and press Enter. The PC can run Dell Recovery & Restore on the USB drive.
How do I restore my Dell Inspiron 530 to factory settings?
When starting these computers, press the F8 key until the Advanced Boot Options menu appears. Select the Repair your computer option and press Enter. Click Next, log in with an administrator username and password, then click each Dell Factory Image Restore option.
How do I boot Dell Inspiron into recovery mode?
Reboot your computer.While Private restarts, press F8 to open the Advanced Boot Options menu.Use the arrow keys to select Repair your computer and press Enter to open the Windows Recovery Environment.
So Reparieren Sie Ihr Inspiron 531-Wiederherstellungslaufwerk Ganz Einfach
Ecco Come Riparare Facilmente L’unità Di Ripristino Inspiron 531
Hier Leest U Hoe U Uw Inspiron 531 Herstelschijf Eenvoudig Kunt Repareren
Voici Comment Réparer Facilement Votre Lecteur De Récupération Inspiron 531
Inspiron 531 복구 드라이브를 쉽게 복구하는 방법은 다음과 같습니다.
Oto Jak łatwo Naprawić Dysk Odzyskiwania Inspiron 531
Veja Como Reparar Facilmente Sua Unidade De Recuperação Inspiron 531
Вот как легко отремонтировать диск восстановления Inspiron 531
Så Här Reparerar Du Enkelt Din Inspiron 531 -återställningsenhet
A Continuación Se Explica Cómo Reparar Fácilmente Su Unidad De Recuperación Inspiron 531