Table of Contents
In this guide, we describe some of the possible causes that can trigger debugging of the stk menu, and then describe various ways to fix the problem.
Updated
SuperTuxKart includes a hidden “Artist Debug Mode” with some features to help artists more easily resolve complaints about their tracks. Dedicated Artist Debug Mode contains rendering views and a number of features for artists and developers.
Running SuperTuxKart from the command line can also provide useful information when debugging terminal output traces.
Enable Executor Debug Mode
With STK closed, open the STK configuration file. (See FAQ “Where is a specific configuration saved?”)
Functions
Fixed Track Layout Bug
- Flying: Karting can potentially be instantly transformed into flying objects. This is very useful for looking closely at grids that are not visible from the street, or for jumping over large sections of the track to reach the area of interest in an upright position.
- I’m flying: high
- K: down
- If there is no dirt underneath exactly where the cards start, STK usually displays an exclusive error message on the terminal with an interrupt; However, in theDebugging the maps can only freeze so you can see what the problem is usually.
- First Person Surveillance Camera (available in the Debug menu): Fly with WASD maps and rotate the camera in addition to Q and E. Use your mouse to control your direction. There is also a soft version that softens your movements, which can be configured in the SuperTuxKart configuration file.
- No Ready-Set-Go: To speed up the analysis of your track, Artist in debug mode, whenever you play alone against any opponent, the Ready / Set / Go message types are very quickly ignored.
Debugging Maps / AI
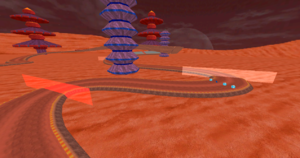
- Debug Control Lines: Run SuperTuxKart from this special command line with
--check-debugand you can probably see visually where the control lines are; installed control lines are displayed in red, inactive ones – in white; and information about which card crosses which control line is usually printed on the terminal. -
--track-debuglets you know where the gears are. - To organize a race on the screen you canBut set 0 laps. This is useful for animating the exam cart.
Graphical Debugging
- Reload Textures (available from the Debug menu): This allows textures such as gloss, alpha, and normal motion directions to be reloaded on the fly, making it much easier to view the aurora map with precision. like in the game. Keyboard shortcut: Ctrl + F3
- Frames per second (available in the menu): debug. Click “Toggle FPS” to display the number of frames per second, calculation, etc. in the game.
- Adjust lighting / adjust values (available in the debug menu): you can adjust the basic values for red, green, blue, green energy and the beam of light closest to the go-kart (nitro headlights and other bright lights. will be ignored) and we will immediately see the action. This also applies to any sun (as long as there is no other light source closer) to easily find the right color for your faithful sun.
Physical Debugging
- Physical Debug (in Debug selection under Graphics): Shows the edges and next Precisely, the normals of some meshes.
- Volatile Normals (in the Debug menu under Graphics): Shows the normals of all meshes, except for animated men. However, it hides all textures.
Alternative Camera Effects
- camera views (available in the debug menu, no GUI)
- Top view
- Enjoy the steering wheel (more like a bottom and back view of a go-kart).
- Behind the go-kart
- Go-kart side view
- Toggle GUI (available in the Debug menu under the GUI): hide the racing GUI, for screenshots, etc.
- Hide the maps (debug menu available, GUI suffers) (Note: no toggle; you will most likely have to end the race and system for the maps to reappear.)
- Change camera target (available in the debug menu)
Items And Attachments
You can give yourself an unlimited number of items through the “Items” submenu. The Attachments submenu creates parameters such as parachutes and anchors (in the game (They are called anvils).
Cinematic Scenes
Executor debug mode also helps to run cut-scenes for testing. From the Debug menu, click Run Cut-Scene and enter the name of the file containing the cut-scene (for example, “Introcat-Scene”).
In-game Screen Recording
SuperTuxKart 0.9. and 3 later has a built-in recorder that can be used to record MJPEG, VP8, VP9, or H.264 video in combination with Vorbis audio. Using this valuable feature requires compiling SuperTuxKart with libopenglrecorder support. Therefore, if it is usually not available when using your Linux distribution system, download the packages containing this feature from our online store. Also, H.264 video recording requires libopenglrecorder OpenH264 to be compiled with media, which may also not work as expected on your Linux distribution due to light issues (although not that important, thanks to Cisco, author of the article OpenH264 should be problematic.) And to record VP9 vp8 video, you need to install libvpx and enable it for libopenglrecorder at compile time.
If SuperTuxKart is clearly organized and registration starts immediately. In the Recording section of most of the Debug menu, click Start Recording to start recording and stop recording when you’re done. When your family stops the recorder, a message will appear to let you know where the file was saved. Please note that encoding may take some time depending on the size of the video being recorded.
Updated
Are you tired of your computer running slow? Annoyed by frustrating error messages? ASR Pro is the solution for you! Our recommended tool will quickly diagnose and repair Windows issues while dramatically increasing system performance. So don't wait any longer, download ASR Pro today!

By default SuperTuxKart writes to VP8 WebM. However, if libvpx is not available, MJPEG is automatically used. Both formats can be played by a media player like VLC, or converted to other formats.
Recorder Configuration
Although the default recorder temperature is normal in most cases, you can change the configuration to get better recordings. Opened, it seems, for the recording section. Here are the most important decisions that you can change:
-
limit_game_fps: Indicates whether graphics should be prevented from rendering in order to actually reach the frames per second intendedfor the record. -
video_format: Determines which encoder is used for the video. VP8 is 0 (default), 1 is VP9, 2 is MJPEG or possibly H.264. MJPEG offers the absolute best recording quality. VP9 is not only recommended because of the extremely long encoding times (e.g. more than 45 minutes for less than 1 minute of video encoding). Note that VP8, VP9 and H.264 are MJPEG encoded because it is not possible to have a new large amount of uncompressed video in RAM. This is essentially double lossy encoding, so I recommend settingrecorder_jpg_qualityto 100. -
video_bitrate: This parameter controls the quality of VP8 and VP9 encoding. The higher the better, but there is definitely no point in going crazy. The default is 20000. -
Recorder_jpg_quality: controls the quality used when encoding with MJPEG. 0 is very low quality, 100 is better quality (although the file size is usually larger). To get the best quality MJPEG encoding or work with VP8 / VP9 / H.264 encoding, set the value to 100. The default is 90. -
record_fps: Records images one by one. Don’t try to writemore frames per second than your computer can output. The default is usually 30, which should work fine in most cases.

Stk Menu Debug
Stk Menu Debug
Stk Menü Debug
Débogage Du Menu Stk
Depuración Del Menú Stk
Depuração Do Menu Stk
Stk-menu Foutopsporing
Debugowanie Menu STK
Отладка меню Stk
Stk 메뉴 디버그