Table of Contents
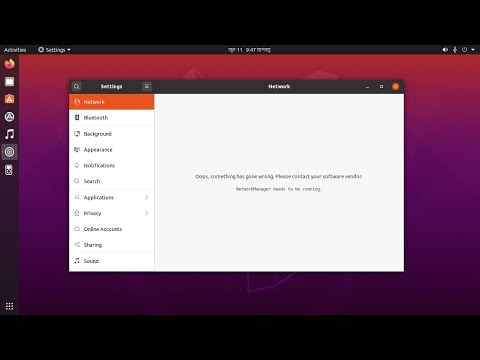
You should read these troubleshooting methods if you receive an error message regarding reinstalling Ubuntu Network Manager.
Updated
This answer assumes that you had access to the Internet before losing the network manager or possibly other packets.
Live CD / DVD / USB
Create a bootable Ubuntu CD / DVD or USB stick, boot from the device and select Try Ubuntu Without Installing. Once you get to the Ubuntu desktop you will get the terml.
Root Section
You need to swap the root partition in the Ubuntu settings. On a standard Ubuntu installation, root, you will see that this is / dev / sda1, but it may be slightly different for you. To see how the root partition came about, run the command right after:
sudo fdisk -l
This will open a list of disks and partitions, which you will probably need to determine which one is the root. Below in step 10, the ROOT PARTITION is the root partition you basically found, for example / dev / sda2 in the user case.
Chroot To Root Section
Someone can mount it to make sure a particular partition is root. So let’s mount the main root partition with partitions / sys, / proc, / run and / dev and enter chroot:
sudo mount ROOT-PARTITION / mntfor me in / sys / proc / run / dev / dev / pts; run sudo mount --situation "$ i" "/ mnt $ i"; didsudo cp /etc/resolv.conf/mnt/etc/sudo chroot / mnt
If you get an error that says resolv.conf is the same as copy, you understand it too easily. Copying resolv.conf will manage the network byAt least for me (with DHCP).
Update / Install Packages
How do I reinstall Ubuntu Network Manager?
Install NetworkManager: sudo apt-get you can install network-manager-gnome network-manager.Then remove WICD: sudo apt-get has wicd wicd-gtk.Reboot your system.Make sure everything works, then remove the WICD config files: sudo dpkg –purge wicd wicd-gtk.
can now update the system – in the same terminal enter:
update apt-getapt-get upgradeapt-get use network manager network manager-gnome
If you usually have problems with the last step, make sure your sources in /etc/apt/sources.list are correct – in the same terminal type:
sudo nano /etc/apt/sources.list
Updated
Are you tired of your computer running slow? Annoyed by frustrating error messages? ASR Pro is the solution for you! Our recommended tool will quickly diagnose and repair Windows issues while dramatically increasing system performance. So don't wait any longer, download ASR Pro today!

Since you are connected to your Ubuntu installation, any changes you help will affect it and not the Live CD if all changes are done in the same terminal session.
When finished, restart your computer and remove the Live CD. If this answer solves your problem, please mark it as correct. Thanks !
Unfortunately, I removed network-manager-gnome with sudo apt-get remove --clear away network-manager . I tried to reinstall the app, but I won’t be able to do it without an internet connection. What’s the solution for this?
Best Answer
sudo dhclient eth0
sudo apt-get get network-manager
WICD (pronounced wicked) is an open wireless manager.Loaded source code for Linux, the goal of which is to provide a simple interface for connecting to networks with a wide range of settings. It mostly supports wired wireless networks (no super duper VPN, DSL routing, etc.), but it’s definitely a good alternative if NetworkManager has problems.
For Gnome / Unity
Ubuntu 18.04.1 and later
For Ubuntu 18.04 and 1 later, you cannot uninstall network-manager without uninstalling ubuntu-desktop . If you follow We askubuntu instructions, you can disable network manager like this:
sudo systemctl stop NetworkManager.servicesudo systemctl remove NetworkManager.servicesudo systemctl stop NetworkManager-wait-online.servicesudo systemctl disable NetworkManager-wait-online.servicesudo systemctl stop NetworkManager-dispatcher.servicesudo systemctl disable NetworkManager-dispatcher.servicesudo systemctl stop network-manager.servicesudo systemctl disable network-manager.service
Old Versions Of The Two Of Us
-
First we need to download the latest version of NetworkManager, we may need to reinstall it if WICD doesn’t work:

sudo apt -get install -d --reinstall network-manager network-manager-gnome
- Then we need to go back To install WICD:
-
sudo apt-get install wicd-gtk
-
-
Then we remove NetworkManager:
-
sudo apt-get remove network-manager-gnome network-manager
-
-
After making sure everything works (better check this restart), you can delete the NetworkManager configuration files:
-
sudo dpkg - - purge network-manager - gnome network manager
-
For KDE (Kubuntu)
-
First we need to download the latest version of NetworkManager, presumably we need to reinstall it if WICD doesn’t work:
-
sudo apt-get install - d --reinstall network-manager Plasma-widget-networkmanagement
-
- Next we need
- <. buy li>
sudo apt-get install wicd-kde wicd:
Then we uninstall NetworkManager:
-
sudo apt-get remove Plasma-widget-networkmanagement network manager
Once you have verified that everything is working (it is best to check if the restart is correct), you can delete the NetworkManager configuration files:
-
sudo dpkg - -purge network-control-plasma-widget network manager
Configure WICD
You can getYou can access WICD either through Applications / Internet / WICD, or simply by clicking the icon on the taskbar that is available in the KDE symbols on the taskbar (at the far right corner of the taskbar), select the settings taskbar and add “Wicd-Client” to the list additional items.
As soon as someone clicks on the Systray widget, a list of available options should appear. Then click Properties (key symbol, also an arrow in older versions) to help the network you want to connect to when specifying your network address or hotspot password if needed:
- Select the Use Encryption checkbox.
- Select the encryption type for the new access point (usually WPA 1/2 Hex or WEP Hex).
- Enter the password for your access point in the Key field. Select
Also, if you want, connect to the Internet automatically. After completing the configuration, return to the list of connections and this time click the name to connect.
For Gnome / NetworkManager: Unit
-
install
-
sudo apt-get install network manager-gnome network manager
< / ul>
-
- WThen remove WICD:
-
sudo apt-get remove wicd wicd-gtk
-
- Reload our system.
- Make sure everything is working, there are no WICD configuration files:
-
sudo dpkg --purge wicd wicd-gtk
-
For KDE NetworkManager: (kubuntu)
-
install
-
sudo apt-get install plasma widget-network management network manager
-
- Then remove the WICD:
-
sudo apt-get remove wicd wicd-kde
-
- Restart the system.
- Make sure everything is busy, then remove the WICD configuration files:
-
sudo dpkg --purge wicd wicd-kde
-
-
Electronic NetworkManager Standard Network Manager
-
WICD Online Store
Speed up your computer today with this simple download.
How do I access network manager in Ubuntu?
On the other hand, a network manager is an nm applet that is usually found in the system tray. An icon created by two computers, one at the bottom and several others on the left. Clicking on the NM applet will give you the connection / hardware types that clients have.
How do I reinstall network manager in mint?
Topic: Reinstalling Network Manager in Mint (KDE version) Launch Synaptic Package Manager, purchase the Network Manager package, right-click it, select Mark for Reinstallation, then simply select Mark as Recommended for Install and uninstall anything required (highlighted).
Comment Résoudre Les Problèmes De Réinstallation D’Ubuntu Network Manager
Como Corrigir Problemas De Reinstalação Do Ubuntu Network Manager
Jak Rozwiązać Problemy Z Ponowną Instalacją Ubuntu Network Manager
Как исправить проблемы с переустановкой Ubuntu Network Manager
Problemen Oplossen Met Het Opnieuw Installeren Van Ubuntu Network Manager
Ubuntu Network Manager 재설치 문제를 해결하는 방법
Cómo Solucionar Problemas Al Reinstalar Ubuntu Network Manager
So Beheben Sie Probleme Bei Der Neuinstallation Von Ubuntu Network Manager
Hur Man åtgärdar Problem Med Att Installera Om Ubuntu Network Manager
Come Risolvere I Problemi Reinstallando Ubuntu Network Manager